
Order, install, activate and connect Amazon — the whole first hour, in one guide.
Eight steps with real screenshots from a real order: picking a plan, checking out, uploading the plugin, activating your licence key and connecting your Amazon Creators API credentials. Works exactly the same for Ama Affiliate Pro and Ama Affiliate Ultra.
What you will have when you finish
- An active subscription with a 14-day free trial and your own billing portal.
- The plugin installed and licence-activated on your WordPress site.
- Your Amazon credentials, partner tag and marketplace saved and verified with a live test.
- A working product-data source — even if Amazon has not granted you API access yet.
This is the first guide in the Ama Affiliate setup series. It covers everything from opening the pricing page to seeing a real Amazon product come back from a live connection test. Every screenshot below is from an actual order placed on 17 August 2026 — personal fields such as the licence key and the credential ID are blurred, and nothing else has been changed.
The steps are identical whether you bought Ama Affiliate Pro or Ama Affiliate Ultra. Where the two differ, it is called out.
Pick your plan on the pricing page
Go to amawp.com/pricing. Every plan contains every feature — the price difference is about how long the licence lasts and how many sites it covers, never about which tools you get.
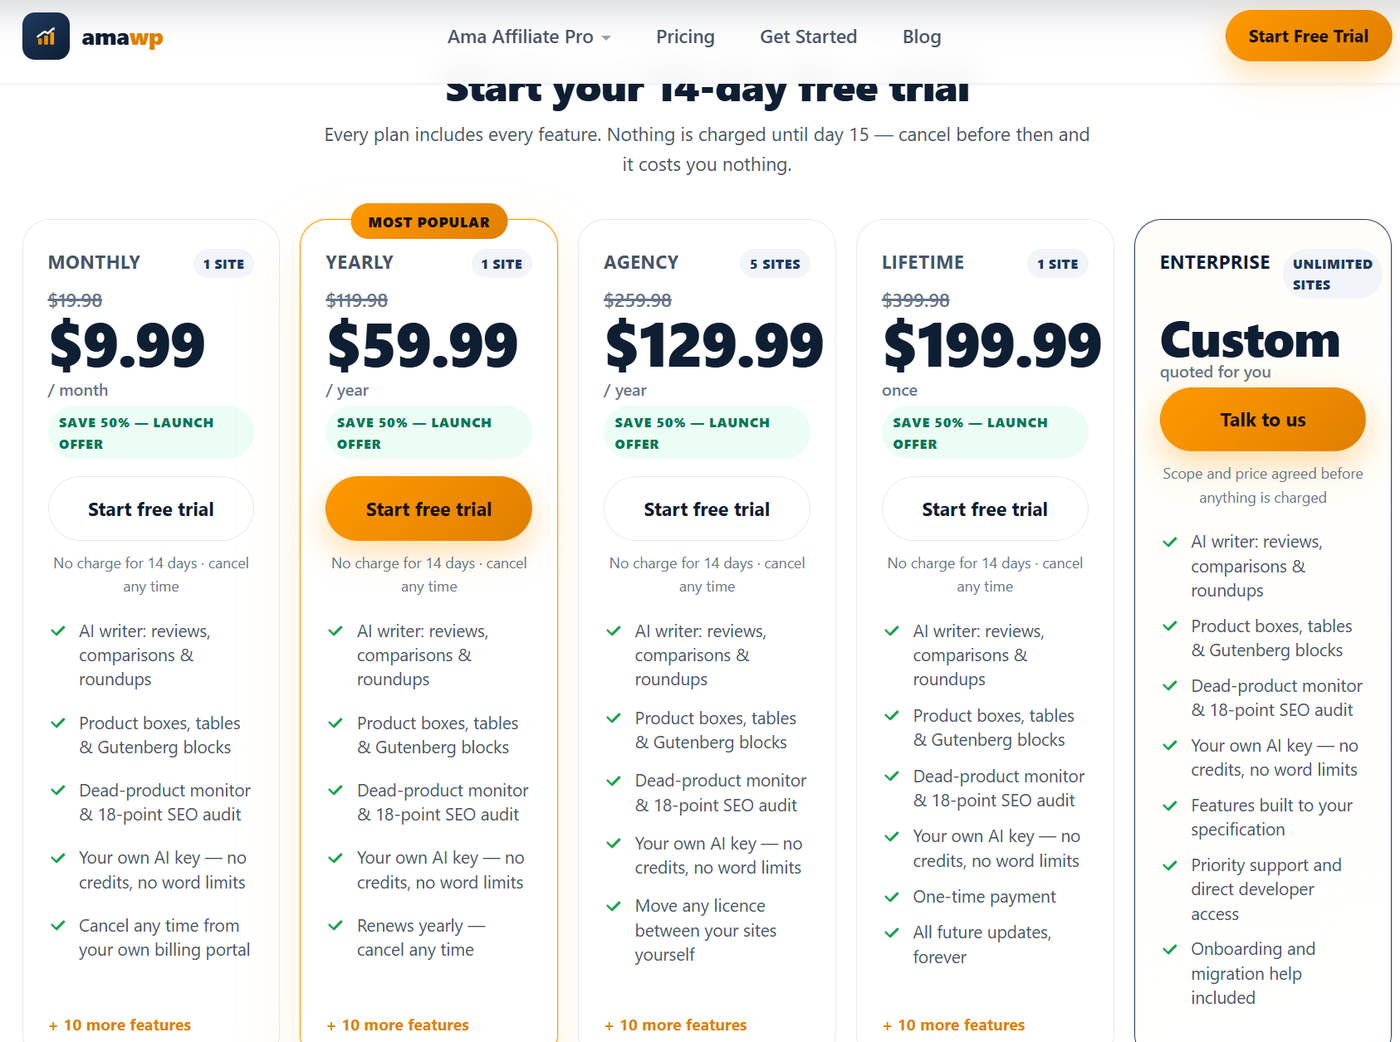
| Plan | Sites | Billing | Pick it if… |
|---|---|---|---|
| Monthly | 1 site | Every month | You want the lowest commitment and cancel-any-time from your own billing portal. |
| Yearly | 1 site | Every year | You are staying past two months — a year costs about half of twelve monthly payments. |
| Agency | 5 sites | Every year | You run several affiliate sites, or you build them for clients. Licences move between sites yourself. |
| Lifetime | 1 site | Once | You want one payment, all future updates, and no renewal date ever. |
| Enterprise | Unlimited | Quoted | You need features built to your specification, onboarding help and direct developer access. |
Press Start free trial on the plan you want. Enterprise is the exception — it uses Talk to us, because scope and price are agreed before anything is charged.
Not sure which plan fits? Ask Amy first
Bottom-right of every page on amawp.com there is an Ask Amy chat bubble. Amy is the support agent — describe how many sites you run and how much you publish, and she will tell you which plan actually fits instead of guessing. A person takes over when one is online; anything else becomes an email ticket answered within 48 hours.
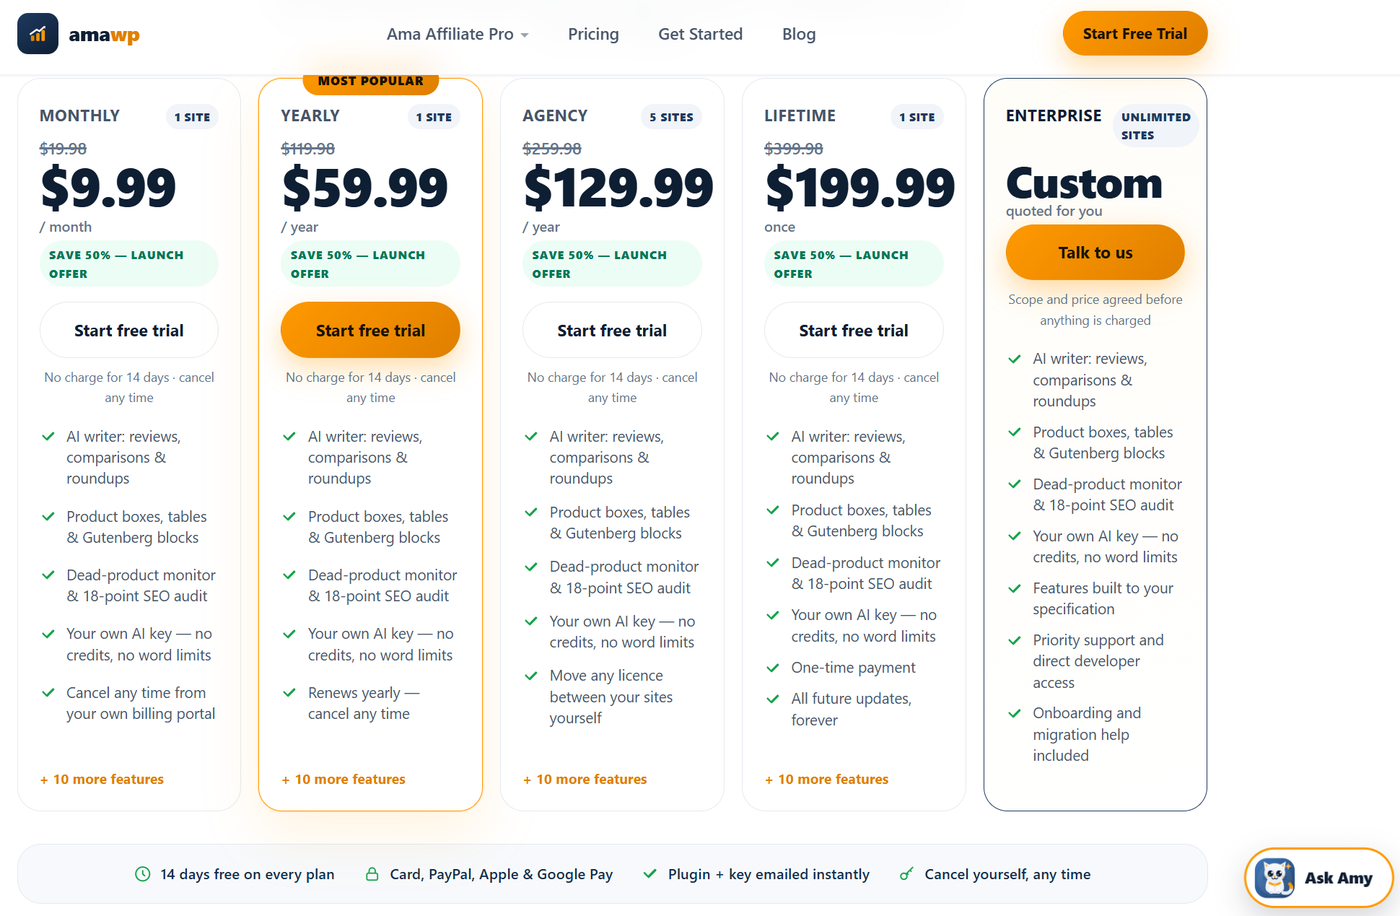
You are not locked in by this choice. Plans can be changed later from the billing portal link in your order email, and an Agency licence can be moved between your own sites whenever you want.
Check out and start the free trial
Clicking Start free trial opens the secure checkout, handled by Lemon Squeezy. The left half repeats exactly what you are buying, so you can confirm the plan and price before entering anything.
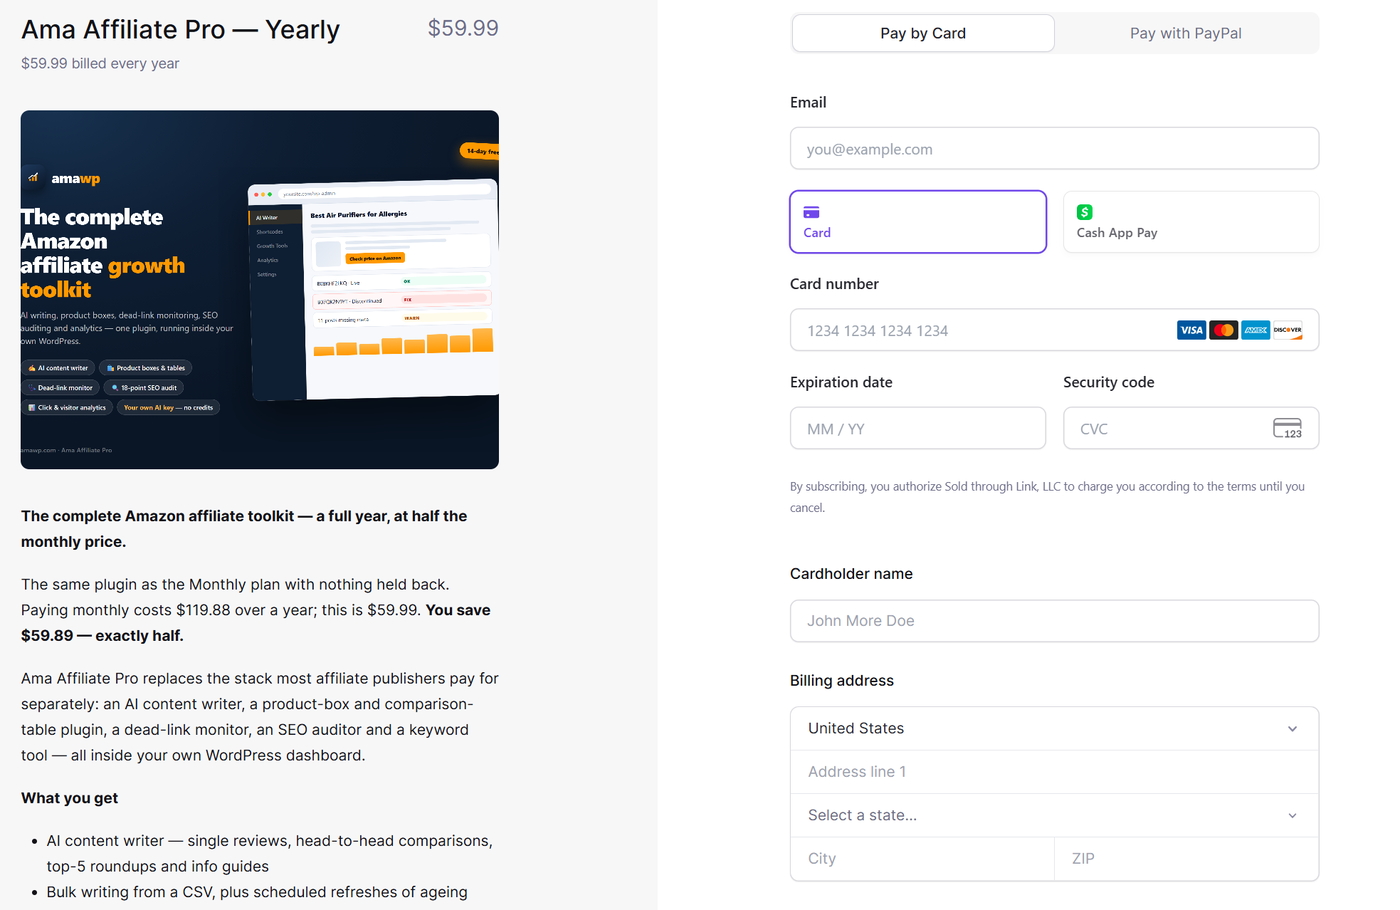
Fill it in, in this order
- Email — use an address you actually read. Your licence key and download link go here, and it becomes your account for the billing portal.
- Payment method — Card or PayPal.
- Card number, expiry, security code — or sign in to PayPal if you chose that tab.
- Cardholder name and billing address — country, address, city and postcode, as your bank has them.
- Press Start trial.
What actually gets charged: nothing today. The card is authorised so the subscription can continue automatically, and the first payment is taken on day 15. Cancel before then from your billing portal and it costs you nothing.
Open the order email — it holds three things
The moment the payment method is accepted, the order confirmation appears on screen and the same information is emailed to you. Keep that email — it is the only place all three of these sit together.
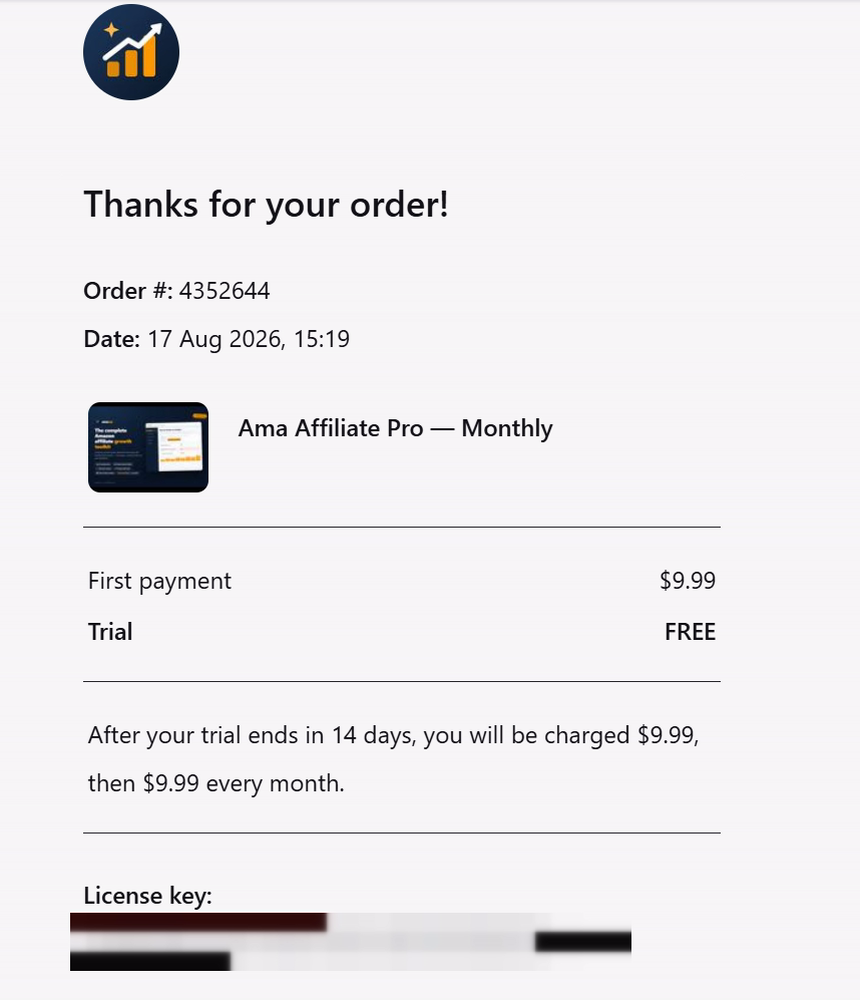
Treat the licence key like a password. It is what activates the plugin on a site and it is tied to your plan’s site allowance. Do not post it in screenshots, forums or support chats — support never needs the full key to help you.
Upload the plugin to WordPress
Download the zip from your order email or account page. Do not unzip it. In your WordPress dashboard go to Plugins → Add Plugin → Upload Plugin, choose the file, and press Install Now.
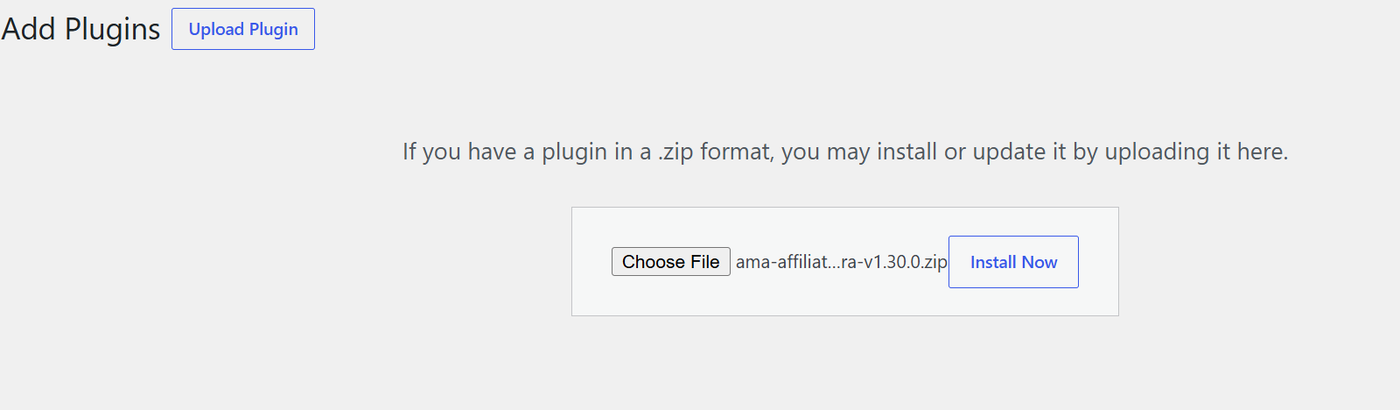
Already running an older version? Deactivate and delete the old copy first, then upload the new zip. Your settings, licence, schedules and published content are stored in the database and survive that — deleting the plugin folder does not delete them. Uploading a second copy alongside the first is the one thing to avoid.
Activate the plugin and meet the dashboard
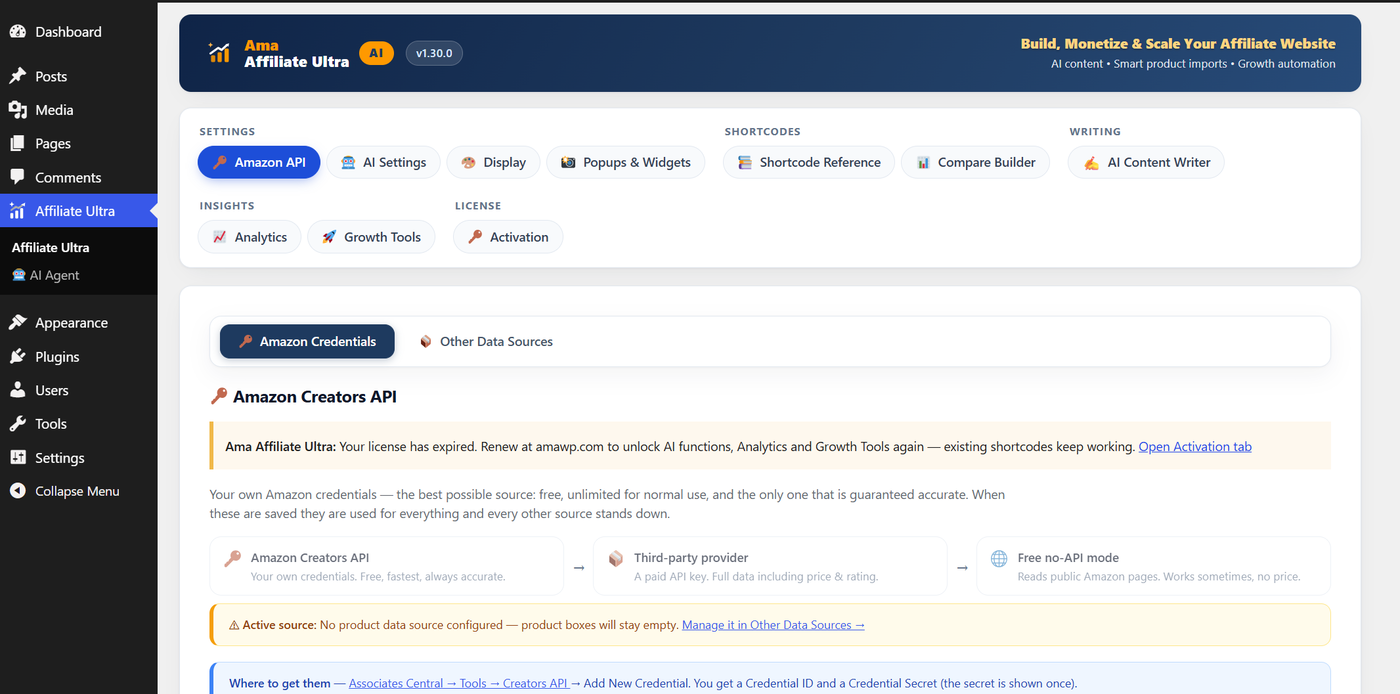
Press Activate Plugin. A new item appears in your WordPress sidebar — Affiliate Pro or Affiliate Ultra, depending on which you bought — and everything lives inside it.
If you bought Ama Affiliate Ultra
If you bought Ama Affiliate Pro
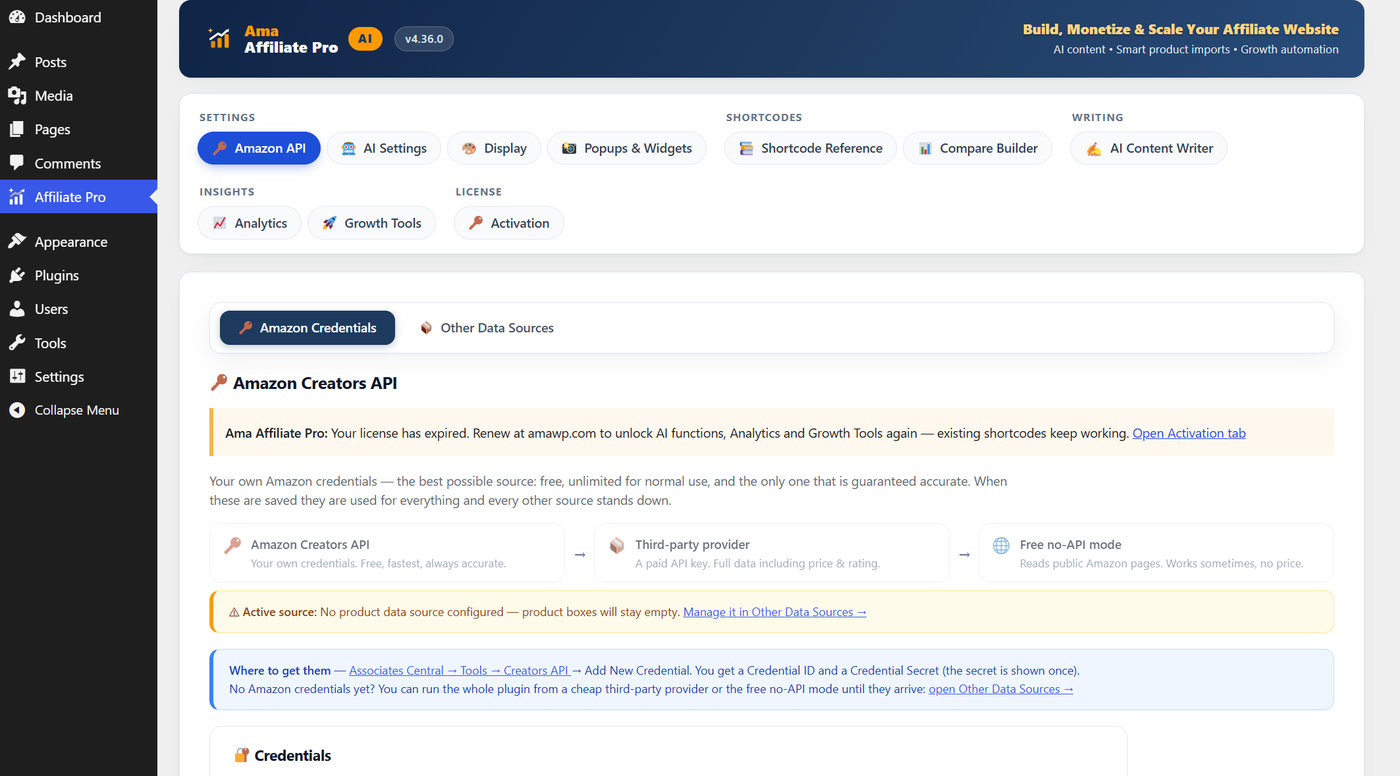
That is the whole difference at this stage. Ultra is Pro plus the autonomous AI Agent. Every tab you will use in the rest of this guide — Amazon API, Activation, AI Settings, Display — is identical in both.
How the tabs are grouped
Activate your licence key
Open the Activation tab, under the LICENSE group. Copy the licence key from your order email — or from the order page linked in it — paste it into the field and press Activate.
How site slots work
- Your key covers the sites your plan includes — one for Monthly, Yearly and Lifetime, five for Agency. Activating uses one slot.
- Once every slot is in use, the key stops activating anywhere new. Free one with Remove key from this installation on a site you no longer need, and it is available immediately.
- Reinstalling on a site that already holds a slot always works and never consumes a second one.
- You are reminded to renew 15 days before expiry — on every plan except Lifetime, which never expires.
What happens if you skip this step? Nothing breaks. The free trial has every feature unlocked. When the trial ends without a key, product boxes, comparison tables, health monitoring and country blocking keep working — AI writing, Analytics and Growth Tools lock until a key is entered.
Connect Amazon
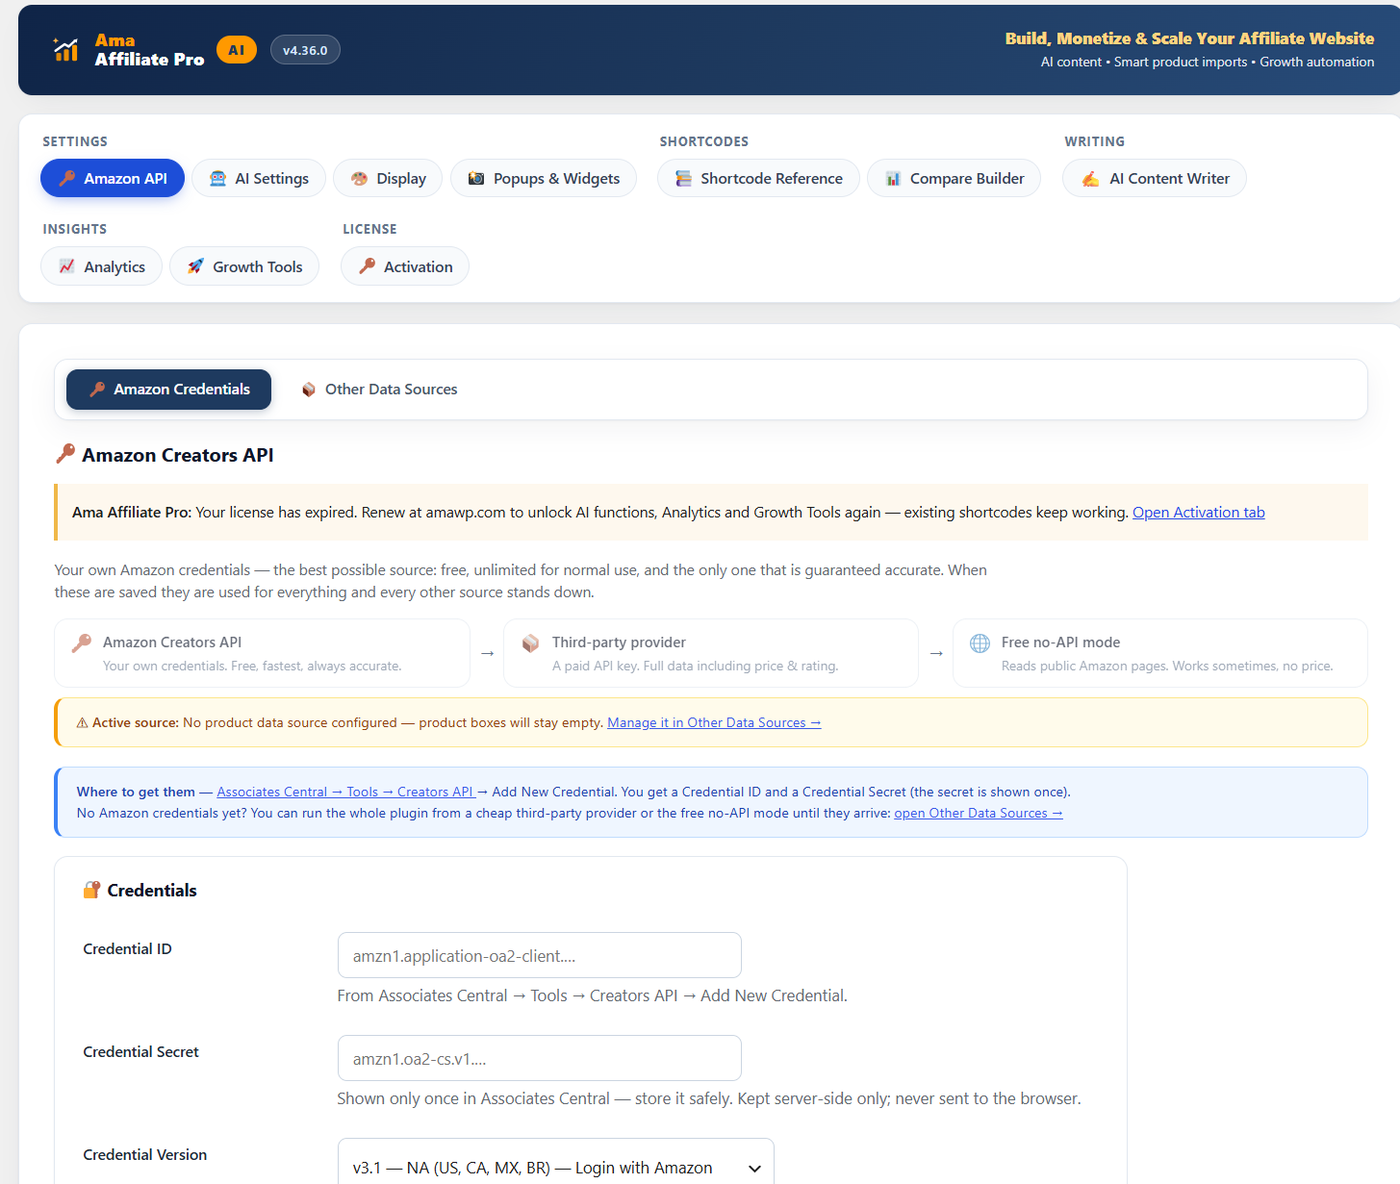
Open the Amazon API tab. This is where the plugin learns two things: where to get product data, and which tracking tag to credit your commissions to.
Where the credentials come from
Log in to Amazon Associates Central. Open the main menu and choose Tools.
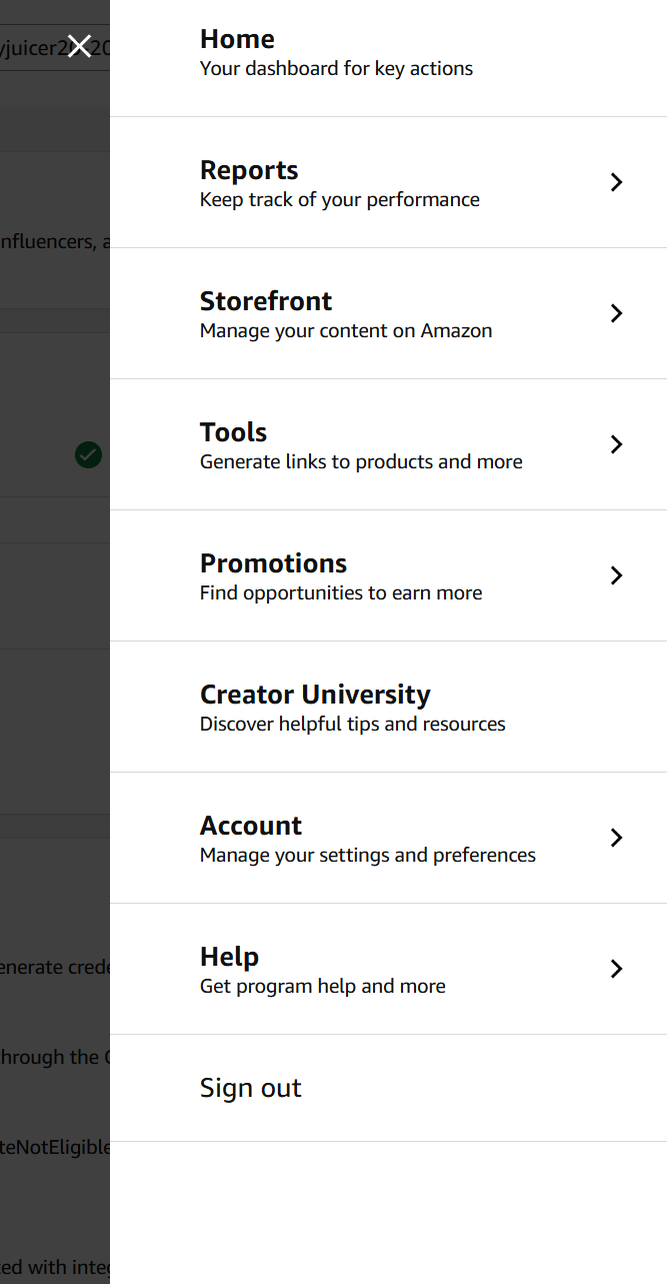
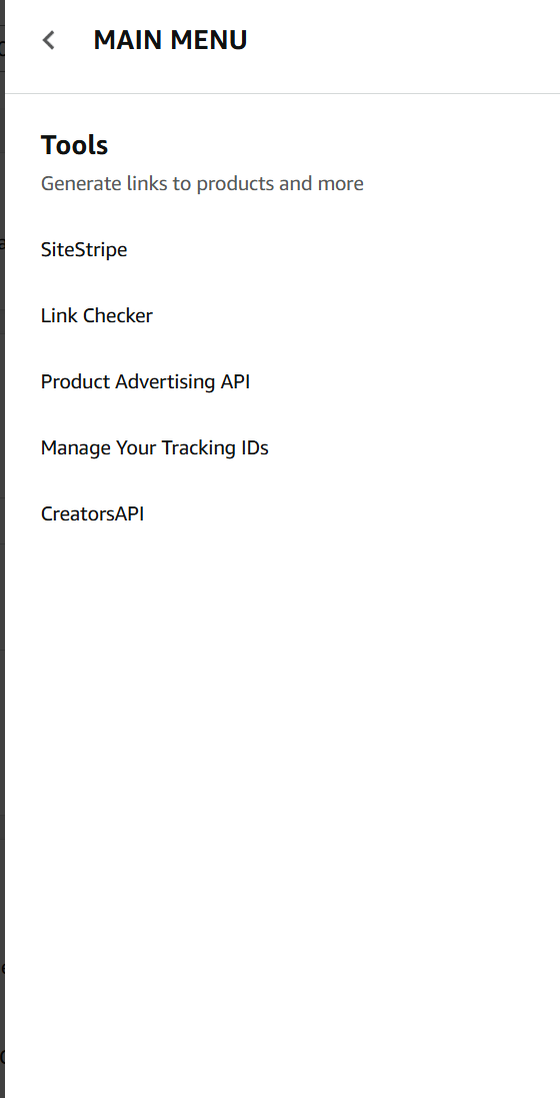
On the Creators API page, press Add New Credential. Amazon generates a pair and lists them under Applications.
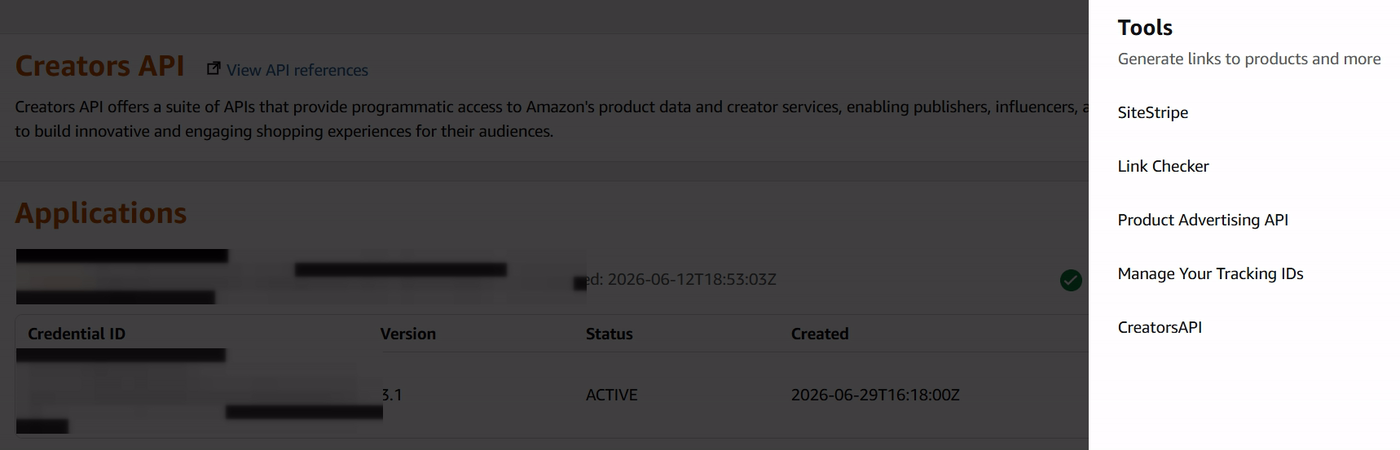
3.1 in this case — and that the status reads ACTIVE.The credential secret is shown exactly once. Copy it the moment Amazon displays it and store it somewhere safe. If you lose it you cannot look it up again — you have to delete the credential and create a new one.
Paste them into the plugin
Back in Affiliate Pro → Amazon API → Amazon Credentials, fill in the five fields.
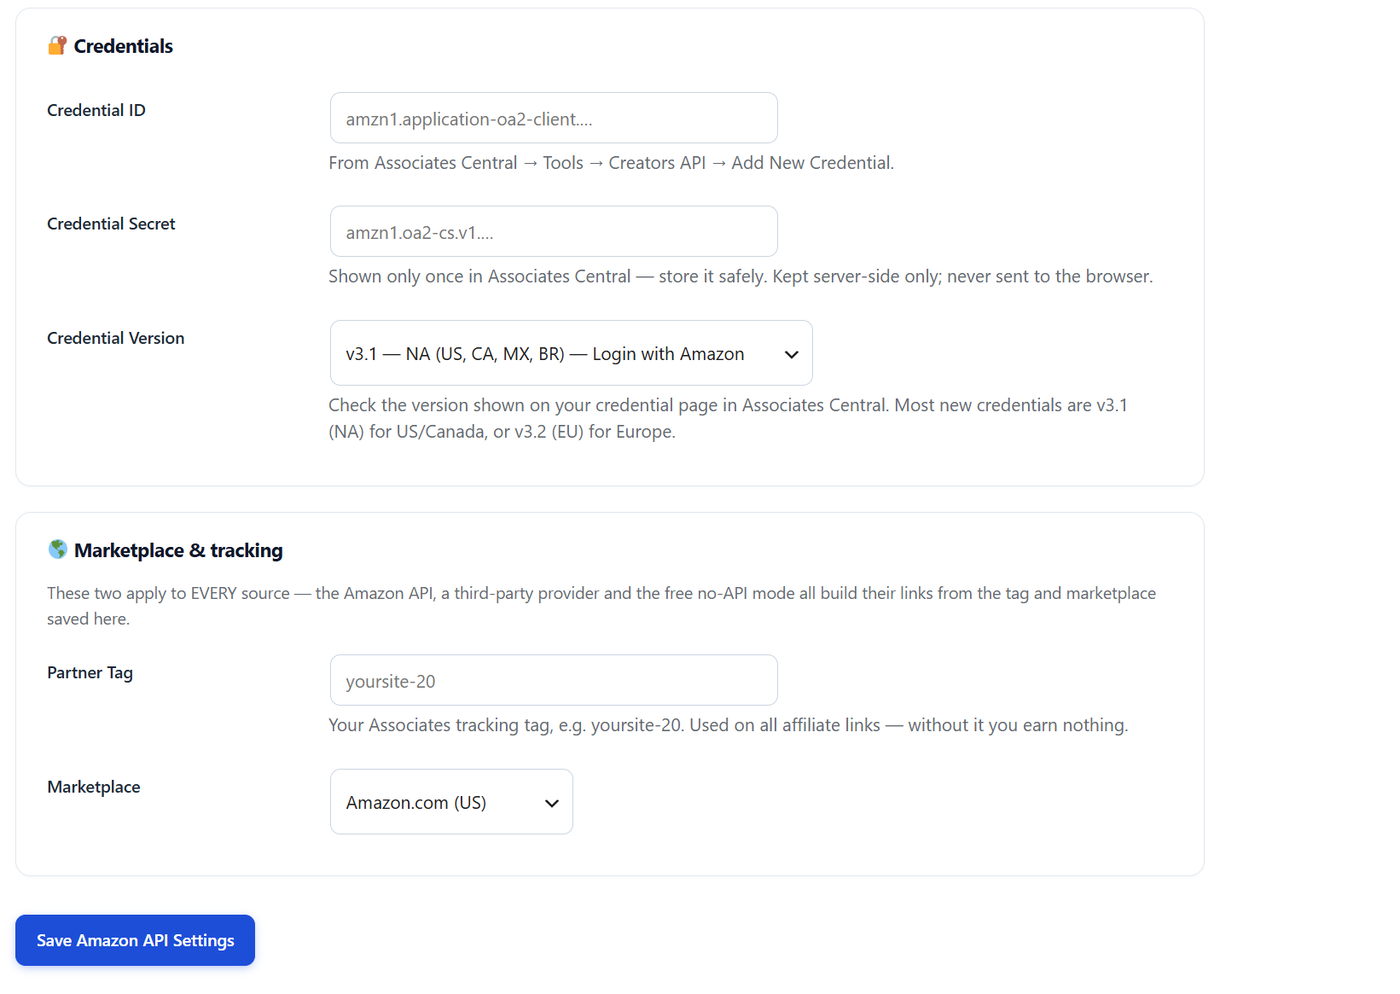
| Field | What to enter | Looks like |
|---|---|---|
| Credential ID | Copied from the Applications table in Associates Central. | amzn1.application-oa2-client.… |
| Credential Secret | The secret shown once when you created the credential. Kept server-side; never sent to the browser. | amzn1.oa2-cs.v1.… |
| Credential Version | Match the version on your credential page. v3.1 for North America (US, CA, MX, BR), v3.2 for Europe. | v3.1 — NA |
| Partner Tag | Your Associates tracking tag. Without this you earn nothing — it is what credits the sale to you. | yoursite-20 |
| Marketplace | The Amazon storefront your audience buys from. | Amazon.com (US) |
Partner tag and marketplace apply to every source. Whether product data comes from the Amazon API, a third-party provider or the free no-API mode, every affiliate link the plugin builds uses the tag and marketplace saved here.
Press Save Amazon API Settings.
Test the connection
Scroll to Test Connection at the bottom of the same tab. Paste any Amazon ASIN — the ten-character code in a product URL after /dp/ — and press the button.
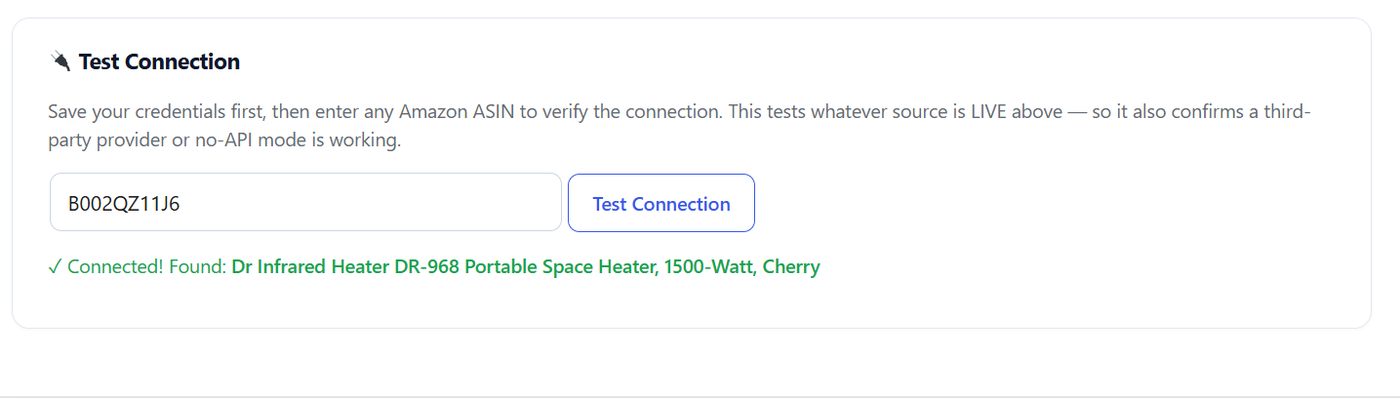
This test checks whatever source is currently live — not just the Amazon API. If you are running a third-party provider or the free no-API mode, the same button confirms that one is working.
No Amazon credentials yet? You can still start today
Amazon does not grant API access to a brand-new Associates account — it typically wants qualifying sales first. That is the single most common thing that stops a new install, and it is why the plugin ships with two fallbacks. Open the Other Data Sources sub-tab.
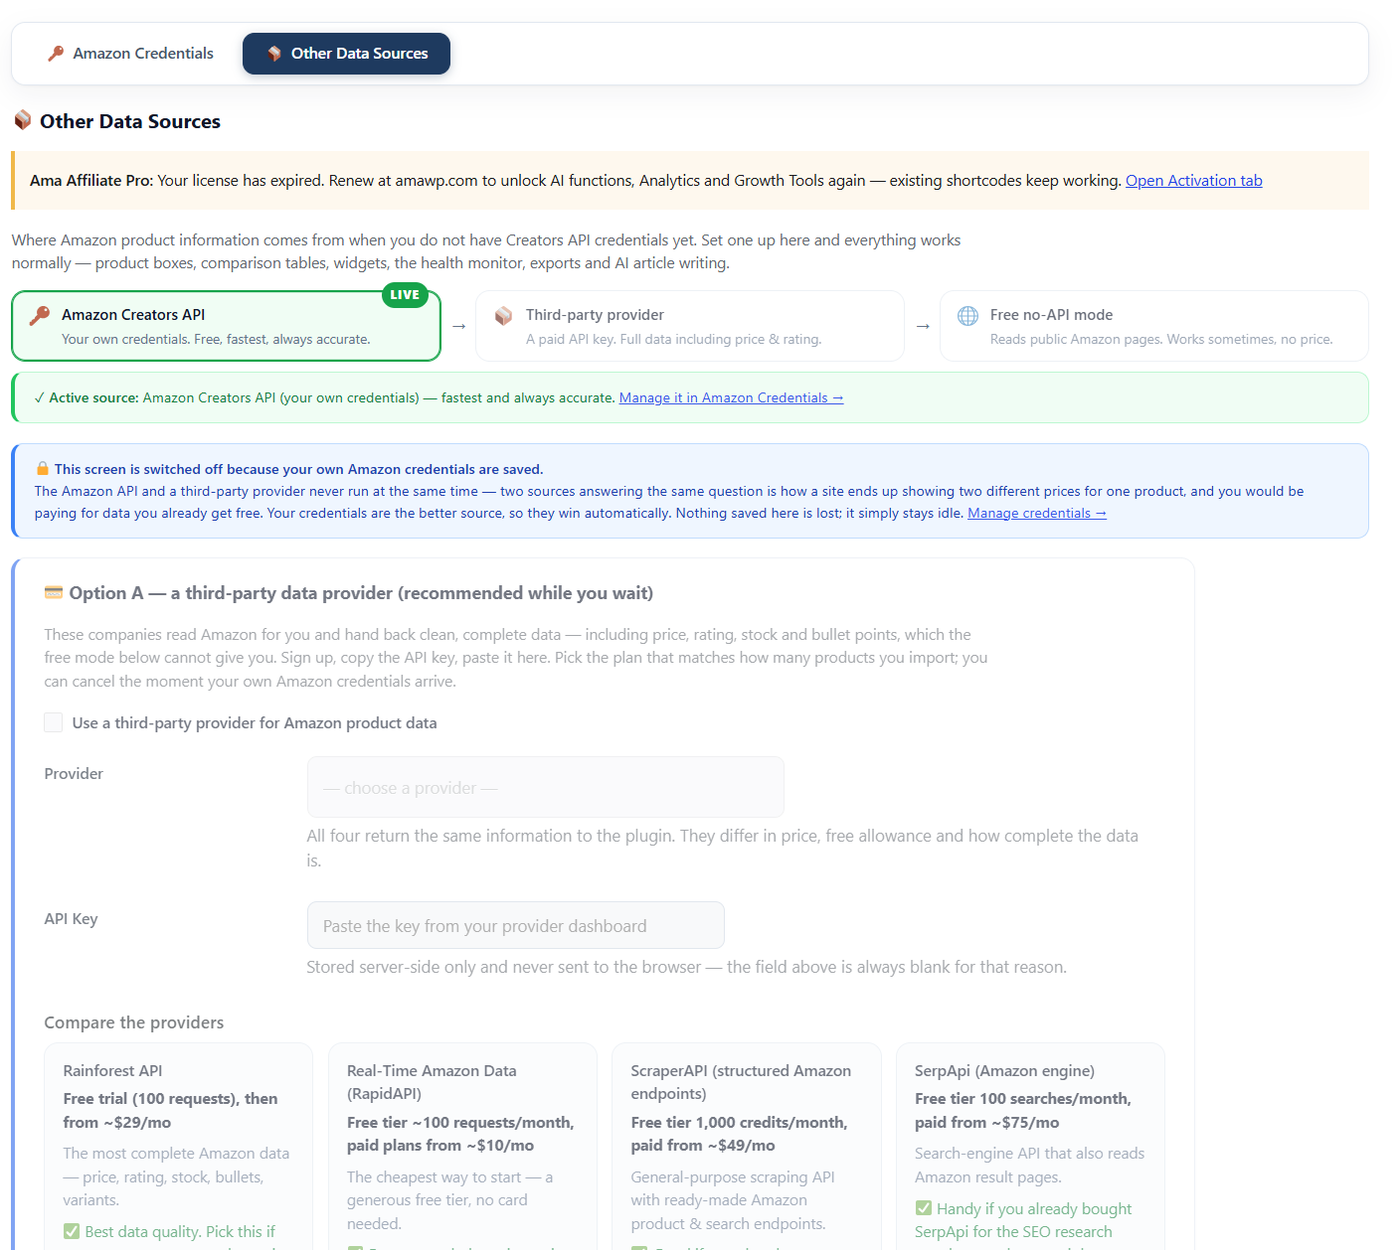
| Provider | Free allowance | Paid from | Pick it if… |
|---|---|---|---|
| Rainforest API | 100-request trial | ~$29/mo | You want the most complete data — price, rating, stock, bullets, variants. |
| Real-Time Amazon Data (RapidAPI) | ~100 requests/month | ~$10/mo | You want the cheapest way to start. Generous free tier, no card needed. |
| ScraperAPI | 1,000 credits/month | ~$49/mo | You already use it, or want a general scraping API with ready-made Amazon endpoints. |
| SerpApi | 100 searches/month | ~$75/mo | You already pay for SerpApi for keyword research and want one bill. |
Tick Use a third-party provider for Amazon product data, choose the provider, paste the key and save. The key is stored server-side only — the field stays blank afterwards for that reason. Then run the same Test Connection from step 8; it confirms whichever source is live.
Nothing you build now is wasted. When Amazon finally grants your credentials, paste them in and save — the plugin switches over automatically, and every product box, table and article you already published keeps working. You can cancel the third-party plan that same day.
If something does not go to plan
| What you see | What it means | What to do |
|---|---|---|
| No order email after several minutes | Delivery delay or spam filtering | Check spam and promotions folders, and search for the order number. The same details are on the order page you saw at checkout. |
| “The plugin does not have a valid header” on upload | You uploaded an unzipped folder, or re-zipped it | Upload the original .zip exactly as downloaded — do not extract it first. |
| Two copies of the plugin in the Plugins list | A new version was uploaded next to an old one | Deactivate and delete the older copy. Settings live in the database and are not affected. |
| Licence key will not activate | Every site slot on the key is in use | Remove the key from a site you no longer need — either from that site’s Activation tab, or from your account. |
| “No product data source configured” | Neither credentials nor a fallback is set | Save Amazon credentials, or switch on a third-party provider or no-API mode in Other Data Sources. |
| Test Connection fails with credentials saved | Usually the wrong credential version | Check the Version column on your Amazon credential page and match it exactly — v3.1 for NA, v3.2 for EU. |
| Product boxes render but you earn nothing | Partner tag missing | Fill in Partner Tag under Marketplace & tracking and save. Links built without it credit no one. |
What to do next
Add an AI provider key
Open AI Settings and paste a key from OpenAI, Claude, Gemini or DeepSeek. You use your own key, so there are no credits and no word limits.
Publish your first product box
Grab a shortcode from Shortcode Reference, drop an ASIN in, and you have a live, tagged product box.
Set the display style
Display controls how boxes, buttons and tables look, so they match your theme before you publish at scale.
Each of those gets its own guide in this series.
Frequently asked questions
Will I be charged during the 14-day trial?
No. A payment method is required so the subscription can continue automatically, but nothing is charged before day 15. Cancel from your billing portal before then and it costs you nothing.
Do I need Amazon API credentials before I buy?
No. The plugin runs from a cheap third-party data provider or the free no-API mode until your own credentials arrive. Amazon usually requires qualifying sales before granting API access to a new Associates account, so most new publishers start on a fallback and switch over later.
How many sites does one licence cover?
One site on Monthly, Yearly and Lifetime; five on Agency; unlimited on Enterprise. Activating a site uses one slot, and removing the key from a site frees that slot immediately. Reinstalling on a site that already holds a slot never uses a second one.
Can I move my licence to a different site?
Yes, and you do it yourself. On the site you are leaving, open the Activation tab and press Remove key from this installation. The slot is free straight away and you can activate the key on the new site.
What happens when the trial ends and I have not entered a key?
Nothing you published breaks. Product boxes, comparison tables, the health monitor, link localization, country blocking and shortcodes keep working. AI writing, Analytics and the Growth Tools lock until a key is entered.
Is any of my data sent to amawp.com?
No. Your API keys, Amazon credentials and content stay on your own hosting and the plugin runs entirely on your server. Activation sends your licence key and site domain, and nothing else.
Is the setup different for Ama Affiliate Ultra?
No. Ordering, uploading, activating and connecting Amazon are identical. Ultra shows an extra AI Agent entry in the WordPress sidebar and reports itself as Affiliate Ultra in the header; every tab used in this guide is the same in both products.
I lost my licence key — how do I get it back?
It is on the order page linked from your order email, alongside the download link. If you cannot find the email either, use the chat window on amawp.com and support will recover it for the address you bought with.
Twenty minutes from here to your first live product box
Every plan includes every feature and a 14-day free trial. Nothing is charged until day 15, and you cancel yourself from your own billing portal.
See plans & start free