
AI Settings, end to end — your keys, your models, your real costs.
Nine sub-tabs, in the order they are meant to be filled in. Add an AI key, set a model for each job, enter your token prices so the cost report matches your bill, and test everything before you write a word.
The 60-second version of this guide. Prefer to read? Everything in the video is written out below, with every field marked on the screenshot.
What you will have when you finish
- At least one AI provider key saved, with your own token prices next to it.
- A model chosen for every job — keywords, comparison tables, article writing and images.
- A green result from Test All APIs Now, so you know the keys and models actually work.
- A cost report that matches your provider’s bill instead of estimating it.
- A fallback provider, so one outage does not stop a bulk run halfway through.
Start here only after the plugin is installed and your licence is activated. If you have not done that yet, work through how to order, install and activate Ama Affiliate Pro first — it covers the order, the licence key and your Amazon credentials. This guide picks up the moment that one ends.
Open Affiliate Pro → AI Settings (or Affiliate Ultra → AI Settings — the tab is identical in both). Everything on this page lives behind the nine items in the left-hand list, and they are laid out in the order you should fill them in.
One thing to be clear about before you start: the AI runs on your own API key. There are no credits to buy from us and no word limits. You pay your chosen provider directly, at their rates, for exactly what you use. That is why this tab matters — it is where you decide who you pay, how much, and for which job.
API Keys & Token Prices
This is the first item in the list and the only one you genuinely cannot skip. Paste in a key from whichever provider you want to use — OpenAI, DeepSeek, Google Gemini or Claude. You can fill in one, or fill in all of them; there is a separate field per provider and each has a link to the page where that key is issued.

Why the two price boxes matter
Under each key there are two small fields, Input and Output, in USD per million tokens. Copy the numbers straight off your provider’s pricing page for the exact model you plan to use.
They are optional. Leave them blank and the plugin falls back to bundled prices — but those go stale the week a vendor changes them, and they can never know about a discounted or enterprise rate on your account. Whatever you type here is applied to the real token counts returned by every API call, which is what turns the cost report further down this page from an estimate into an actual figure.
Not mandatory, genuinely worth the two minutes. Prices change often. Set a reminder to check them when your provider announces new rates, and this tab keeps telling you the truth about what you are spending.
Custom 3rd-party AI provider
Skip this one unless you have a reason to use it. It needs a little technical confidence — you have to read the API example your provider gives you, usually a curl command, and pull three things out of it. Leave the URL blank and the whole section stays switched off. Nothing you have already set up changes.
Some resellers and gateways serve the same models as the official APIs — Claude, GPT and DeepSeek among them — through an endpoint of their own, often much cheaper. Add one here and it behaves exactly like a built-in provider: it appears in every dropdown under Model Per Task, it can be used as a fallback, and it can be tested like any other.

| Field | Where it comes from | Notes |
|---|---|---|
| Provider name | You choose it | Purely a label. It is the name that shows in every provider dropdown. |
| API base URL | Your provider’s docs | Either the base ending in /v1 or the full completions URL — both work. Must start with https://. The screen shows you the exact address requests will go to, so you can check it before saving. |
| API key | Your provider’s dashboard | Kept server-side only. Leaving it blank on a later save keeps the key you already stored. |
| Model IDs | Your provider’s model list | One per line. The plugin cannot guess what your provider accepts, so nothing appears under Model Per Task until you list them here. |
Save, then use Verify All API Keys & Models in step 4 to confirm it. A working provider comes back green; a wrong URL, a bad key or a model name your provider does not recognise comes back red with the reason.
Model Per Task
This is where the money is either well spent or wasted. Each job in the plugin gets its own provider and model, because the jobs are not remotely alike — one sends a handful of words, another writes two thousand.

Keyword Generation — what it actually does
This one confuses people, so it is worth being precise. Keyword Generation is what makes related products appear inside an article without you picking them by hand. The AI reads your post title, works out the product keyword behind it, and that keyword is what the plugin searches Amazon with. The matching products are then shown in whichever widget you have switched on — the floating widget, the exit-intent popup or the ticker bar.
So this setting is the engine behind the AI widgets. If the provider and model here are wrong, AI product matching simply will not work, no matter how well the widgets themselves are configured. The widgets are switched on separately under Popups & Widgets — that tab gets its own guide in this series.
The Daily Keyword Call Limit next to it is a spend guard: a ceiling on how many live API calls the widgets may make in 24 hours. The screen shows how many you have used today.
The rest of the jobs
Scroll on and the same tab covers image generation, image branding and the year the AI writes into titles.

Images
Leave it on flux — the free Pollinations model, no API key, recommended and fine for most feature images. Free requests occasionally fail; the paid tier (flux-pro) needs a Pollinations key and is more reliable. You can also point it at an OpenAI image model, and more models are coming.
Your name on the picture
Tick Site Name on Images and your domain is drawn onto every AI-generated image before it reaches the media library, so every thumbnail carries it too. Size, text colour and outline colour are yours to set.
Current Year is a small field that saves a recurring embarrassment. AI models are trained on older data and will happily write “Best Air Purifiers 2024” into a title. Set the year here and any older year in a generated title is corrected to it automatically. Not mandatory — but update it each January and you never have to think about it again.
Verify All API Keys & Models
Save your settings, then come to this tab and press the button. It sends a tiny test request to each configured task — Keyword Generation, Compare Builder and Content Writing — and confirms that the key and the model together actually work.

Green means that task is ready. Red tells you which one is not, and why. A key can be perfectly valid and still fail here because the model name is wrong for that provider — this button is the fastest way to find out which of the two is the problem.
Make a habit of it: change a key or a model, save, come back here and press it. It costs a fraction of a cent and it is the difference between finding a problem now and finding it halfway through a bulk run.
AI API Calls — the last 24 hours
A running log of every live AI request in the last 24 hours across all tasks — keyword generation, compare builder and content writing. It counts what was answered from cache (free) separately from what actually went out to a provider, and shows an approximate cost.

On a busy site the count sits near 100, because that is how many calls the log keeps. Use Clear Log to reset it when you want a clean read on a specific run.
Test Keyword AI
Type any article title and press the button. This checks the one thing step 3 set up: that the AI turns a title into a usable product keyword, which is what the floating widget, popup and ticker rely on to find related products.

Use a title you would really publish. If the keyword that comes back is not what a shopper would type into Amazon, change the model under Keyword Generation and test again — that is a much cheaper way to find out than publishing an article with the wrong products in it.
Test AI Image Generation
The same idea for pictures. Enter a keyword, press Test Image, and confirm that whichever image model you chose in step 3 is returning something.

If you left the image model on free flux, an occasional failure here is normal rather than a misconfiguration — try once more before changing anything. Persistent failures mean the model or key needs attention.
Content Generation & Cost — the last 30 days
Every article generated in the last 30 days, grouped by provider and model, split by how it was written — single review, head-to-head, top-5, info guide, an existing post, an auto-refresh or part of a bulk run — with what each cost.
This is the tab that pays back the two minutes you spent on token prices in step 1. Here is the same screen before and after.
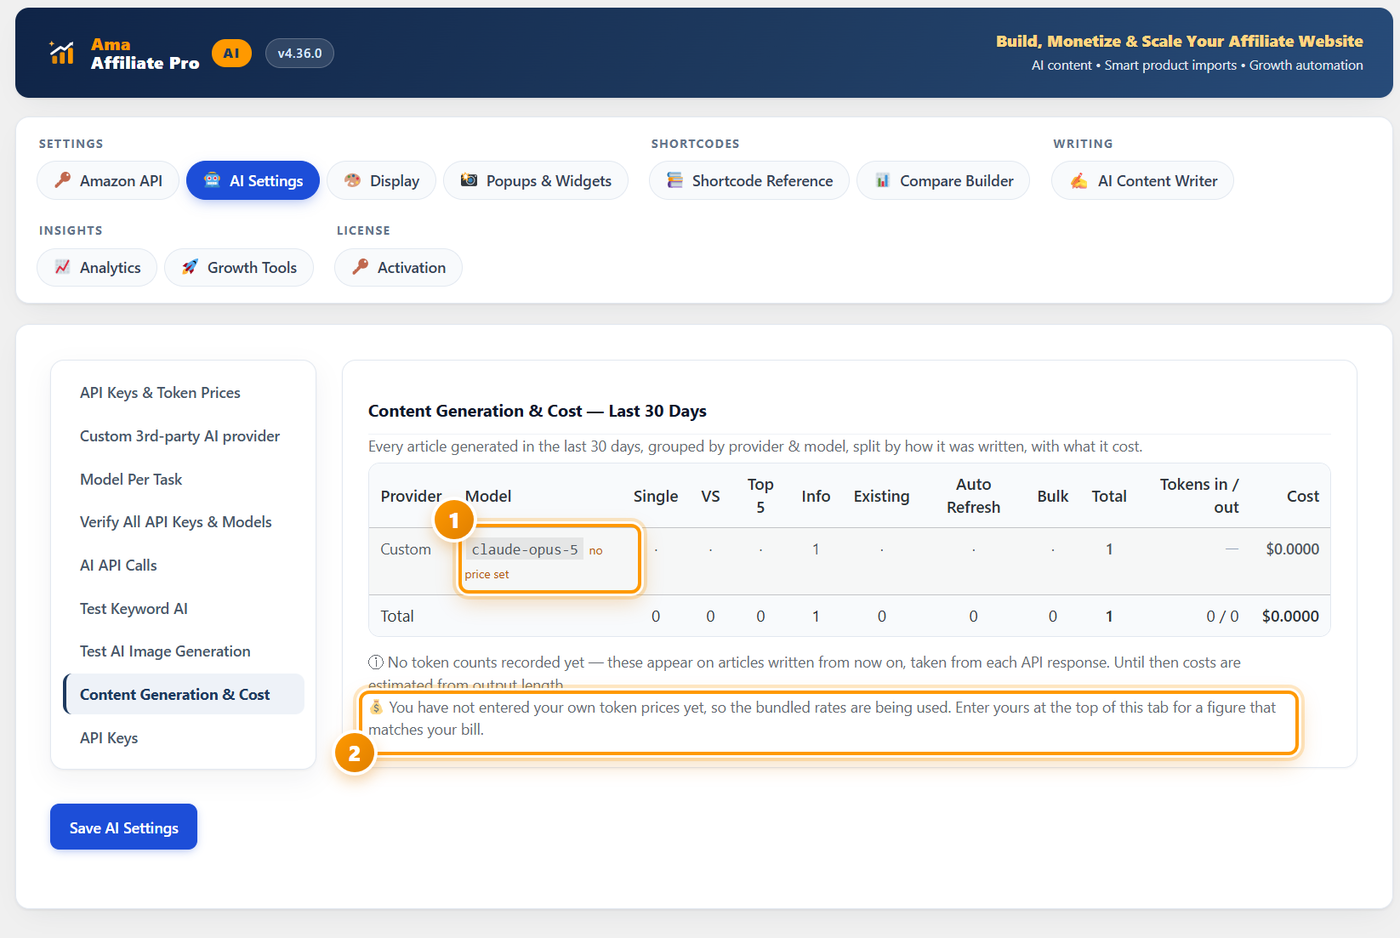
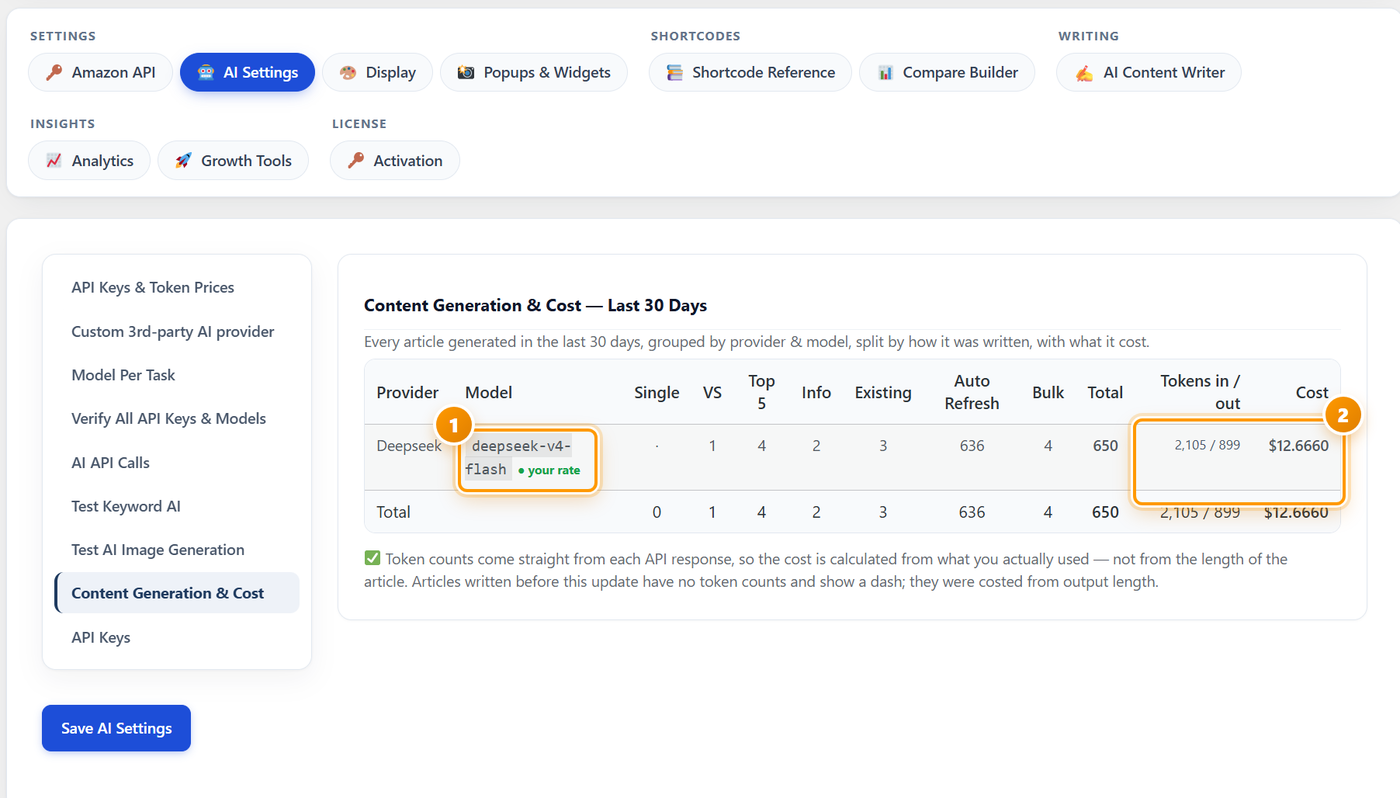
Token counts come straight from each API response, so the cost is calculated from what you genuinely used rather than from the length of the finished article. Articles written before this feature existed have no token counts and show a dash — those were costed from output length.
Writing the articles themselves happens on the AI Content Writer tab, which is the next guide in this series.
API Keys — turn on provider fallback
The last item in the list. If the selected provider fails mid-task — an outage, a quota, a network blip — the same request is retried with your fallback providers instead of the run simply stopping.

Only providers with a saved API key are ever used, so leaving both dropdowns on Auto is a perfectly good answer — it simply takes the next provider you have a key for. Set them explicitly if you would rather control the order, for instance to make sure a costly model is never the automatic second choice.
Enable or disable it as you prefer. It matters most on long bulk runs, where one failed call would otherwise leave a job half finished.
Which model for which job — what we actually recommend
The jobs have genuinely different demands, so the right answer is not one model for everything.
| Job | Recommended | Why |
|---|---|---|
| Content Writing | DeepSeek | Long articles need a capable model, and this is where nearly all of your spend goes. DeepSeek gives the best quality per dollar for the volume writing most affiliate sites do. |
| AI Compare Builder | DeepSeek | Comparison tables send short prompts. There is no reason to pay for an expensive model here. |
| Keyword Generation | Gemini — the free model is enough | Turning a title into a product keyword is a small job. The free Gemini tier handles it, and the daily call limit keeps it contained. |
| AI Image Generation | flux (free, no key) | Free, no API key, and good enough for feature images. Move up to flux-pro only if the occasional failure bothers you. |
Where Claude fits. The latest Claude models produce genuinely impressive writing — and they are expensive. If budget is not the constraint, use Claude for Content Writing and keep the cheap models everywhere else. For most publishers DeepSeek is the better trade.
You are not locked into any of this. Write a few articles, look at the output on the AI Content Writer tab, compare what each model cost you on the Content Generation & Cost report, and change the model whenever you want. That is exactly what these dropdowns are for.
Paid subscriber or free user — who needs this tab
If you are a paid subscriber
Fill in every setting on this page properly. The AI features are the reason to have a licence, and an unset model or an untested key is the most common cause of “the AI stopped working” — so do the tests in steps 4, 6 and 7 before you rely on it.
If you are on the free trial
You can leave this tab empty. Once the trial ends the AI features lock, so there is nothing to configure — everything that keeps working after the trial is display and monitoring, not writing.
Free users can unlock the AI features again at any time by taking a plan from the pricing page — every plan includes every feature, and the settings on this tab are waiting exactly as you left them. If you are still deciding between the two products, Pro vs Ultra compares them side by side; the AI Settings tab in this guide is identical in both.
If something does not work
| What you see | What it usually means | What to do |
|---|---|---|
| Verify comes back red for one task only | The model name is wrong for that provider | Check the model ID against your provider’s current list, or type it into the Custom model ID field — that always overrides the dropdown. |
| Verify is red for every task on one provider | The key itself | Re-copy the key from the provider dashboard. Watch for a trailing space, and confirm the account has billing enabled. |
| A model you used has disappeared from the dropdown | The provider retired it | Type any current model ID into the Custom model ID field for that task. It wins over the dropdown, so a retired model never blocks you. |
| AI product matching is not working in the widgets | Keyword Generation is unset or failing | Set a provider and model under Keyword Generation, then run Test Keyword AI. The widgets themselves also have to be switched on under Popups & Widgets. |
| Your custom provider will not save or test | The URL | It must start with https://. Compare the “Requests will go to” line against the curl example in your provider’s docs. |
| Nothing appears in the model dropdown for your custom provider | No model IDs listed | Add them under Model IDs, one per line. The plugin cannot discover what your provider accepts. |
| Image tests fail now and then | Free-tier flux | Expected. Retry, or move to flux-pro with a Pollinations key if it needs to be dependable. |
| The cost report does not match your bill | Bundled prices are being used | Enter your input and output token prices under each key in step 1, then reload this tab. |
| AI features are locked entirely | Trial ended, or no licence key | Check Activation. Part 1 of this series covers activating a key. |
What to do next
Write your first article
With the keys and models set, the AI Content Writer tab can produce a review, a head-to-head, a top-5 or an info guide. That tab is the next guide in this series.
Switch on the AI widgets
Popups & Widgets is where the floating widget, exit-intent popup and ticker bar are enabled — the three that use the Keyword Generation model you just set.
Read the whole picture first
New to the plugin? What is Ama Affiliate Pro explains every feature and how they fit together.
Frequently asked questions
Do I have to add an API key at all?
Only if you want the AI features. Product boxes, comparison tables, the health monitor, link localization, country blocking and analytics all work without one. Everything that writes or generates needs a key, because the AI runs on your own account rather than on credits bought from us.
Which single provider should I start with?
DeepSeek. It is the cheapest capable option for content writing, which is where nearly all of your spend goes, and it handles the compare builder too. Add a free Gemini key alongside it for keyword generation and your running cost stays very low.
Are the token price fields required?
No. Leave them blank and bundled prices are used. But bundled prices go stale whenever a vendor changes rates and can never reflect a discount on your account, so the cost report will only ever be an estimate. Enter your own and it matches your bill.
Where is my API key stored, and can visitors see it?
Server-side on your own hosting, and no. Keys are never sent to the browser, which is why the field looks empty after you save — that is the plugin refusing to echo it back, not a lost key.
What happens if my provider goes down mid-article?
With AI provider fallback enabled, the same request is retried with your second and then third provider, so the run continues. Only providers with a saved key are used. With it disabled, the task stops and reports the failure.
A model I was using has been retired. Do I have to wait for a plugin update?
No. Every task has a Custom model ID field that overrides the dropdown. Type any model ID your provider currently accepts and it is used immediately.
Can I use a cheaper reseller instead of the official APIs?
Yes — that is what the Custom 3rd-party AI provider section is for. You need the endpoint URL, the key and the exact model IDs from your provider’s documentation. Once saved it behaves like any built-in provider, including as a fallback.
Is the AI Settings tab different in Ama Affiliate Ultra?
No. The tab, the sub-tabs and every field are the same. Ultra adds a separate AI Agent in the WordPress sidebar, which uses the same keys and models you configure here.
Your key, your models, your real numbers
No credits, no word limits, no metering. The licence fee is the only thing you pay us — the AI runs on your own API key at your provider’s rates. Every plan includes every feature and a 14-day free trial.
See plans & start free